


When it comes to the safety and performance of your motorcycle, the brakes play a crucial role. One of the most critical components of the braking system is the rotor, which works in conjunction with the brake pads to ensure effective stopping power. Over time, brake discs can wear out or become damaged, necessitating a replacement to maintain optimal performance.
Replacing the brake discs is not only essential for safety, but it can also enhance the overall riding experience. A fresh rotor improves braking responsiveness and reduces stopping distances. In this guide, we’ll take you through the steps to change your motorcycle’s brake discs safely and efficiently, ensuring you can get back on the road with confidence.
Before beginning, it’s important to have the right tools and equipment at hand. Understanding the specific requirements for your motorcycle model will help you navigate the process with ease. Follow these step-by-step instructions to ensure your brake system remains in top condition and ready for any ride.
Choosing the Right Brake Rotor for Your Motorcycle
Selecting the appropriate brake rotor for your motorcycle is essential for optimal braking performance and safety. Understanding the differences in rotors can greatly enhance your riding experience and maintain the effectiveness of your brakes.
1. Compatibility: Ensure that the rotor you choose is compatible with your motorcycle’s make and model. Not all rotors fit every bike, so consulting your owner’s manual or contacting the manufacturer can provide crucial information.
2. Material: Brake rotors are typically made from either cast iron or carbon composite materials. Cast iron offers durability and a traditional feel, while carbon composite rotors are lighter and can provide improved heat dissipation, which is critical for high-performance situations.
3. Design: There are various designs of rotors available, including slotted, drilled, and solid. Slotted and drilled rotors allow for better water dispersion and cooling, while solid rotors are more common for everyday use. Consider your riding style; aggressive riders may benefit more from slotted or drilled designs.
4. Size: The size of your rotor affects braking efficiency. Larger rotors usually provide better heat management and more stopping power, especially for front brakes. However, they may add weight and require modifications to your bike. Check specifications to find the ideal balance between performance and compatibility.
5. Brand and Quality: Reputable brands often produce rotors with better quality control. While it might be tempting to opt for cheaper options, investing in a reliable rotor can save you money in the long run by reducing wear on your brakes and enhancing overall performance.
In conclusion, choosing the right brake rotor for your motorcycle involves careful consideration of compatibility, material, design, size, and quality. Making the right choice ensures your front brakes perform optimally, providing you with the safety and confidence you need while riding.
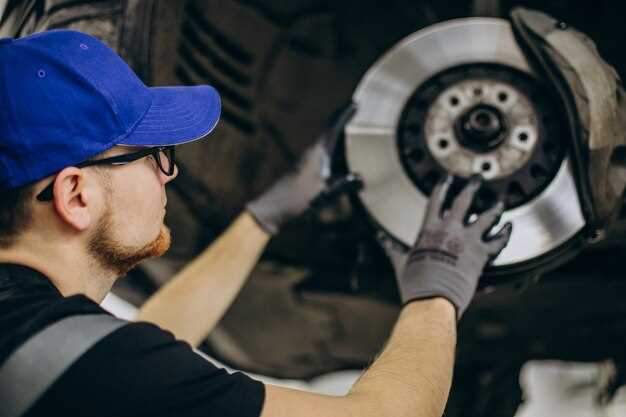
Step-by-Step Guide to Removing Old Brake Discs
Before starting the removal process, ensure that you have all the necessary tools ready, including a socket set, wrenches, and a brake rotor puller if needed. Make sure the motorcycle is on a stable surface and secured with a stand.
1. Begin by removing the front wheel. Loosen the axle nut and any pinch bolts that hold the wheel in place. Carefully slide the axle out while supporting the wheel.
2. With the wheel removed, locate the caliper that houses the brake pads. Use a socket to unscrew the caliper mounting bolts. Once they are removed, slide the caliper off the rotor and secure it away from the working area without putting stress on the brake line.
3. Next, examine the brake rotor. Use a suitable wrench to remove the bolts that secure the rotor to the wheel hub. These are typically a set of small bolts around the circumference of the rotor. Turn counterclockwise to loosen them.
4. After removing all bolts, gently wiggle the rotor to detach it from the matrix. If it feels stuck, check for any remaining bolts or debris that might be holding it in place. Ensure the area is clean to avoid scratching the new rotor when it is installed.
5. Once the rotor is free, remove it from the wheel assembly and set it aside. Inspect the wheel hub for any dirt or debris and clean it if necessary, preparing for the installation of new brake discs.
Installing New Brake Discs: Tips for Proper Alignment
Proper alignment of your new brake rotors is crucial for safe and effective braking performance. Here are some tips to ensure that your front brake discs are installed correctly:
- Clean the Mounting Surface: Before installing the new rotors, thoroughly clean the hub surface where the rotor mounts. Remove any rust, dirt, or debris to ensure a flat and smooth contact surface.
- Check for Warpage: Inspect the new rotors for any signs of warpage or defects. Place the rotor on a flat surface and ensure that it sits evenly without rocking.
- Align the Rotor with Bolt Holes: Position the rotor over the mounting holes, ensuring that the holes align perfectly with the studs. It’s essential that the rotor can move freely without forcing it into place.
- Use Proper Torque Specifications: Refer to your motorcycle manual for the specific torque settings for brake rotor bolts. Use a torque wrench to tighten the bolts in a crisscross pattern to evenly distribute pressure.
- Check Rotor Clearance: After installation, check for proper clearance between the rotor and the brake caliper. Spin the wheel to verify there’s no rubbing noise. Adjust if necessary.
- Test Braking Performance: After installation, take a short test ride to evaluate braking performance. Pay attention to any vibrations or unusual noises that may indicate misalignment.
By following these tips, you can ensure that your new brake discs are properly aligned, contributing to enhanced braking efficiency and safety on the road.


